How To Use A Plate Bevelling Machine
Here is a professional guide about how to use a manual feed plate beveller aka plate bevelling machine and it’s setting up, tool change, cleaning, and maintenance.

This is a step by step complete guide on how to use plate beveling machines. In brief, this article covers the following points,
- Components of the SKF 25 plate beveling machine
- Safety measure before setting up the plate beveller
- Checking the workpiece
- Setting the milling head of the plate beveller
- Setting the chamfer width plate beveller
- Mounting the rollers of the plate beveller
- Milling with the plate beveller
- Using the plate beveller
- Tool change of the bevelling machine
- Cleaning of the bevelling machine
- Maintainance of the bevelling machine
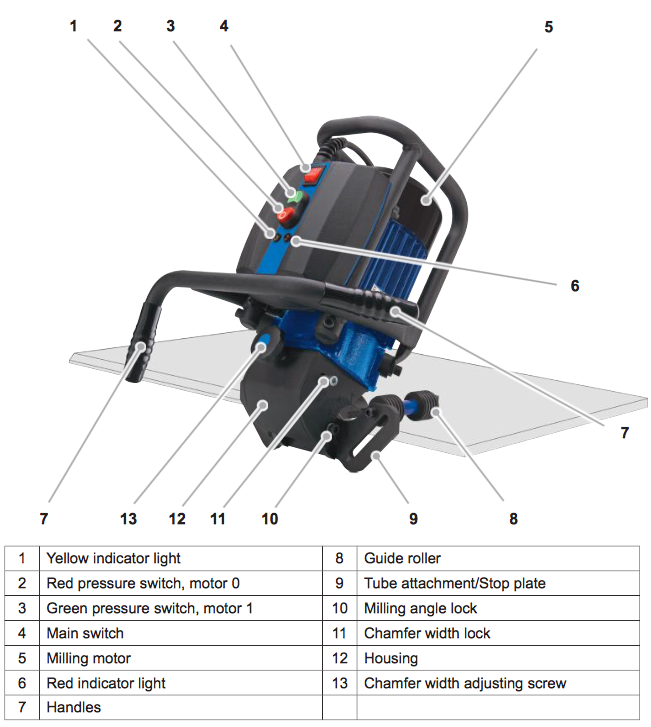
Components of the SKF 25 plate beveling machine
Safety measure before setting up the plate beveller
The beveling machine may only be operated in a horizontal position. Secure the workpiece.
Checking the properties of the workpiece.
The surface of the workpiece must meet the following require- ments. The surface must be smooth and may not have any burn points, slag, welding joints or similar. Before beginning with milling, remove surface unevenness.
Setting the milling head
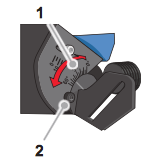
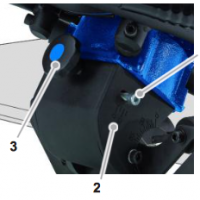
Place the machine onto the upper side (power connecting cable ). Release the locking mechanism (2) on both sides of the machine. Set the desired milling angle. The milling angle can be viewed on the scale (1). Tighten the locking mechanism (2) on both sides of the machine.
Setting the chamfer width
Place the machine onto the upper side (power connecting cable ). Release the locking mechanism (1). Set the desired chamfer angle by turning the adjusting screw (3). The chamfer width can be viewed on the scale (2). Tighten the locking mechanism (1).
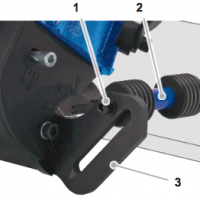
Mounting the guide roller for milling plates
Mount the plate (3) according to the illustration. Fix the guide rollers (2) in the borehole (1) with the washer and nut.
Milling with the plate beveller
For milling, proceed as follows:
- Align the workpiece to be processed horizontally and secure it.
- Mount the guide roller according to the desired application, see section Mounting the guide roller.
- Set the milling angle and chamfer width, see section Setting the milling angle and Setting the chamfer width.
- Insert the plug into the mains socket.
- Put the machine onto the workpiece so that the miller does not move into the workpiece.
- Switch on the machine, see section Switching on the plate beveling machine.
- Slide the plate beveling machine slowly and evenly from right to left in the direction of the arrow. The tool operates against the direction of travel.
- Switch off the plate beveling machine, see section Switching the plate beveling machine on/off.
- Pull the plug out of the mains socket.
CAUTION
Potential damage to property if the machine is improperly used!
► Observe the following instructions to avoid damage.
► Lay the connecting cable so that it cannot be caught by the running machine.
NOTE
Observe the following instructions.
► Never attach the reversing plates to the material during standstill.
► Maintain an even feed.
Using the plate beveller
Followoing procedure shows how to operate the plate beveller:
Switching on the machine
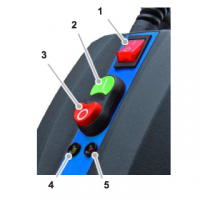
- Move the main switch (1) to position “1”.
- Push the green pressure switch (2) to switch on the milling motor. The yellow indicator light (4) lights up.
Switching off the machine
- Push the red pressure switch (3) to switch off the milling motor.
- Move the main switch (1) to position “0”.
Restarting after overloading
In order to switch on the machine again after overloading, press the red pressure switch (3) first followed by the greenpressure switch (2).
NOTE
► The red indicator light (5) ashes in the event of temporaryoverloading.
► In the event of continuous overloading, the red indicator light (5) lights up and the milling motor is switched off.
Changing the tool (inserts) of the plate beveller
WARNING: Risk of injury!
► Do not use damaged, soiled or worn tools (inserts).
► Change tools (inserts) only when the machine is switched off and at standstill. Pull the plug out of the mains socket.
► Only use tools, adapter and accessories that match the machine.
Turning the insert side
- Place the machine onto the upper side (power connecting cable ).
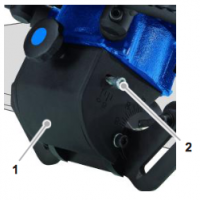
- Remove the screw (2).
- Remove the housing (1).
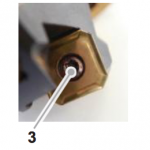
- Remove the xing screw (3), turn the reversing plate and tighten the xing screw again.
- Repeat the procedure for all reversing plates of the miller.
- Replace the housing again and tighten the screw (2).
Replacing the inserts
When the reversing plate is completely worn, it must be replaced by a new one:
- Remove the xing screw and remove the reversing plate.
- Insert the reversing plate and tighten the fastening screws again.
